Home | Looking for something? Sign In | New here? Sign Up | Log out

Tuesday, 29 November 2011

How to Add Widgets to your blog.


How to Add Widgets to your blog.

UPDATE : Blogger has now replaced the "Add Page Element" link with the "Add Gadget" link. Clicking on this link will bring up the "Add a Gadget" popup window. All the original Blogger widgets are listed under the Basics subtab in this popup window.

Blogger widgets are now called as Blogger Gadgets. The rest are Google Gadgets which have now been integrated into the Blogger Layout----->Page Elements tab.

To add widgets/gadgets to your blog ...........


Login to your Dashboard and click on Layout under your Blog name. This brings up the Page Elements page under the Template tab.

IMPORTANT : PAGE ELEMENTS ARE ONLY AVAILABLE IF YOU ARE IN BETA BLOGGER WITH A BETA TEMPLATE AND NOT ON FTP.
A Page Element is the other name for a Widget in Beta Blogger. Page Element are contained within Sections. The four Sections of your Blog are : Header, RightSidebar, LeftSidebar, Main(Blog Posts) and Footer. Click on Add Page Element link in any Section of the Layout. This opens the Choose A New Page Element window. Here are listed the types of Page Elements :
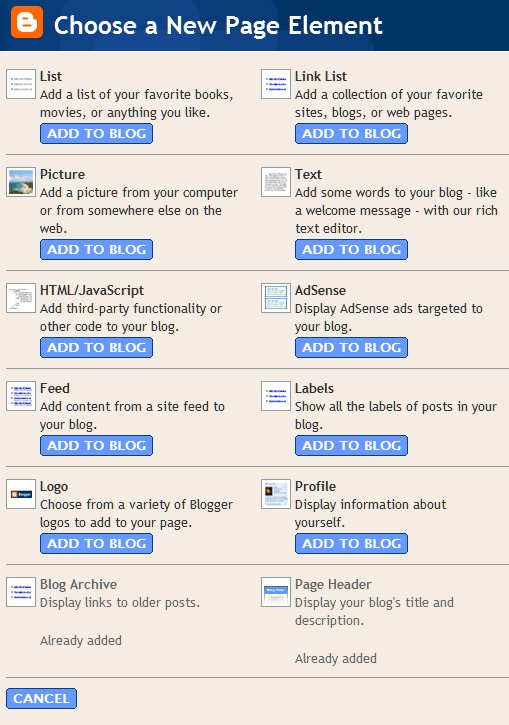
  1. List. Add a list of your favorite books, movies, or anything you like.
  2. Link List. Add a collection of your favorite sites, blogs, or web pages.
  3. Picture. Add a picture from your computer or from somewhere else on the web.
  4. Text. Add some words to your blog - like a welcome message - with our rich text editor.
  5. HTML/Javascript. Add third-party functionality or other code to your blog. You can add any Javascript here. Javascript need not be written for beta blogger specifically. To search for Javascripts just Google for them and then copy paste here.
  6. Adsense. Display AdSense ads targeted to your blog.
  7. Feed. Add content from a site feed to your blog.
  8. Labels. Show all the labels of posts in your blog.
  9. Logo. Choose from a variety of Blogger logos to add to your page.
  10. Profile. Display information about yourself.
  11. Blog Archive. Display links to older posts.
  12. Page Header. Display your blog's title and description.


Choose the type of Page Element you want and enter the data you want it to carry. Then Save Changes and View Blog.

To Edit the Page Element after adding it click on the Edit link in that section in Page Elemnts tab.
NOTE : PAGE ELEMENTS ARE REFERRED TO AS WIDGETS INTHE TEMPLATE CODE.
This will open a window to give access to edit options of each Page Element. For example if you click on Edit in Blog Posts section you will see the following window :


Here you can choose whether to show your Labels below your posts and other options. In the same way you can access other Page Elements for editing. You can also rearrange Page elements from this page by drag-and-drop method. To do this click on the element you want to move hold the click, drag it to new position and drop it (release click) there. See image below :


You can also add third party Page Elements from other sites.
CONFUSED ABOUT WHICH PAGE ELEMENT TO CHOOSE? THEN SELECT THE HTML/JAVASCRIPT OPTION.
So if you're on another site and enounter a button that says [+Blogger] or [Add to Your Blog] click on such a button, you should be prompted to log in to Blogger (if you aren't already logged in) and then you can select one of your blogs. You'll also see the title, content and template for the new page element, which you can edit if you want. A logo and "more info" link may also be present to tell you more about where this page element comes from, who created it, and what it does.

By clicking the [Add Page Element] button on this screen, you will be adding code to your blog. So it's important to make sure you either trust the source of this code, or have reviewed it to make sure it's something you're willing to have on your blog.

Once you've added the page element, it will appear on the Template | Page Elements tab for your blog, where you can edit, move, or delete it, just like the other parts of your page.


Add A Shoutbox To Blog

 
Where you can get a shoutbox? there is very much site provide this service. One of them ishttp://www.shoutmix.com. At this site you can get a shoutbox for free (basic account). This is the steps for get a shoutbox at shoutmix : 

  1. Please visit http://www.shoutmix.com.


  2. Before you must register, please click "CREAT YOUR SHOUTBOX NOW", or you can click "SIGN UP" at upper tab.


  3. If you are has registered at shoutmix, please login with your ID.


  4. At the column with title Style, click appearance.


  5. Then click pull down menu beside Load From Preset for setting your shoutbox, please SELECT which you want. If it is done, don't forget to click Save Setting.


  6. To get HTML code for your shoutbox, please click "Use Shoutbox


  7. Click at "Place Shoutbox on WEBPAGE, write the width and hight you want.


  8. Copy all of the HTML code at text area below of "Generated Codes, paste at notpad and then save to your computer.


  9. Click "Log out" and then close.


  10. Done. now you have a shoutbox code for add to your blog.

Now you can add your shoutbox code to your blog, please following the steps : 

  1. Login to blogger with your ID.
  2. After entering the dasboard page , click Layout. Please saw the picture :
  3. layout
  4. Click at Page Element tab. See the picture below :
  5. page element
  6. Click at Add a Page element.
  7. After emerging pop up window , Klik add to blog button for the things HTMl/java script See the picture following :
  8. javascript
  9. Open your Shoutbox code, copy and then paste into available column.


  10. Click   save changes   


  11. Done. Please see the result.

Now you have a Shoutbox at your blog.

Make A Table Of Content


Make A Table Of Content

Do you like to read the book? your answer surely will immeasurable, there is to answer to like and there is also to answer don't like. But I sure you have read a book. In a book is be one named by table of contents, with table of contents will make the reader the book easy to find the parts the content of a book wishing in reading. The question possibly emerge is what is his relation between books with blog? there is, do not only a book that can make the table of contents, in a blog even also we can do it,


There is 2 steps to make a Table Of content at the blog : 

Step #1 

  1. Login to blogger with your ID.
  2. After entering the dashboard page , click Layout.
  3. Then click edit HTML tab.
  4. Click the Download full template link. Save your template.
  5. Please mark the little box beside Expand Widget Templates. Wait for a moment. 


  6. Go to your template code, and find the code like this : 

    <b:include data='post' name='post'/>


  7. Delete above code, and replace with the following code : 


  8. Click Save Template button
  9. Done.

Step #2 

  1. Click at Page Element tab.
  2. Click at Add a Page element.
  3. After emerging pop up window , Klik add to blog button for the things HTML/JavaScript.
  4. Copy and paste the code below into available column : 

    <a href="http://YourBlogName.blogspot.com/search?max-results=200">Show all post &raquo;&raquo;</a>


  5. Alter YourBlogName with your blog name. Example : my blog name is rohman-freeblogtemplate. Alter200 with other number, because this is the sum of how much post want to show.
  6. Click   save changes   
  7. Finish. Please see the result.

Boring With Error Message "Widget IDs Should Be Unique


Boring With Error Message "Widget IDs Should Be Unique" ?

Possibly you ever have the pip when doing Edit HTML at your template code always experience of failure with error message like this : 


We were unable to save your template. 

Please correct the error below, and submit your template again. 

    More than one widget was found with id: HTML1. Widget IDs should be unique.


Or maybe like this: 

We were unable to save your template. 

Please correct the error below, and submit your template again. 

    More than one widget was found with id: Feed1. Widget IDs should be unique.


Error message is same , the different only at ID, that is HTML1 and Feed1. And that is just an example, ID which emerge possibly HTML2HTML3HTML4 etc, or possibly also Feed2Feed3Feed4 etc. Possibly you will feel to confuse with this error message, because you can't edit your template code. The questionpossibly emerge that is what do cause can emerge the error message like that? if I may answer possible it be like this : error message emerge because in your template code is have two widgets or more with same ID. Still confuse? I give an example. For example in your template code have widget code be like this : 

<div id='sidebar-wrapper'>
<b:section class='sidebar' id='upsidebar' preferred='yes'>
<b:widget id='HTML1' locked='false' title='' type='HTML'/>
<b:widget id='HTML4' locked='false' title='' type='HTML'/>
<b:widget id='HTML3' locked='false' title='' type='HTML'/>
</b:section>
<b:section class='sidebar' id='sidebar1' preferred='yes'>
<b:widget id='HTML5' locked='false' title='Belajar buat website' type='HTML'/>
<b:widget id=''HTML1' locked='false' title='Free Download' type='HTML'/>
<b:widget id='BlogArchive1' locked='false' title='Arsip Blog' type='BlogArchive'/>
<b:widget id='HTML6' locked='false' title='' type='HTML'/>
<b:widget id='HTML7' locked='false' title='Yang mampir' type='HTML'/>
<b:widget id='HTML8' locked='false' title='Site feed' type='HTML'/>
<b:widget id='HTML9' locked='false' title='' type='HTML'/>
<b:widget id='HTML10' locked='false' title='' type='HTML'/>
</b:section> 


At the example above seen two widget codes with the same ID, that is HTML1 (attention the red letter): 


<b:widget id='HTML1' locked='false' title='' type='HTML'/>

<b:widget id='HTML1' locked='false' title='Free Download' type='HTML'/>


If the case such as the example, of course you can't Saving your template code because it will always error. What must be doing if the case like that? you must change one of widget ID with diffrent ID. Example : change HTML1 with HTML15 or other number, but the number must be different with other widget ID. 


<div id='sidebar-wrapper'>
<b:section class='sidebar' id='upsidebar' preferred='yes'>
<b:widget id='HTML1' locked='false' title='' type='HTML'/>
<b:widget id='HTML4' locked='false' title='' type='HTML'/>
<b:widget id='HTML3' locked='false' title='' type='HTML'/>
</b:section>
<b:section class='sidebar' id='sidebar1' preferred='yes'>
<b:widget id='HTML5' locked='false' title='Belajar buat website' type='HTML'/>
<b:widget id='HTML1' locked='false' title='Free Download' type='HTML'/>
<b:widget id='BlogArchive1' locked='false' title='Arsip Blog' type='BlogArchive'/>
<b:widget id='HTML6' locked='false' title='' type='HTML'/>
<b:widget id='HTML7' locked='false' title='Yang mampir' type='HTML'/>
<b:widget id='HTML8' locked='false' title='Site feed' type='HTML'/>
<b:widget id='HTML9' locked='false' title='' type='HTML'/>
<b:widget id='HTML10' locked='false' title='' type='HTML'/>
</b:section> 


You just change one of widget ID with different number, example : HTML1 changed with HTML15, for example : 


<div id='sidebar-wrapper'>
<b:section class='sidebar' id='upsidebar' preferred='yes'>
<b:widget id='HTML1' locked='false' title='' type='HTML'/>
<b:widget id='HTML4' locked='false' title='' type='HTML'/>
<b:widget id='HTML3' locked='false' title='' type='HTML'/>
</b:section>
<b:section class='sidebar' id='sidebar1' preferred='yes'>
<b:widget id='HTML5' locked='false' title='Belajar buat website' type='HTML'/>
<b:widget id='HTML15' locked='false' title='Free Download' type='HTML'/>
<b:widget id='BlogArchive1' locked='false' title='Arsip Blog' type='BlogArchive'/>
<b:widget id='HTML6' locked='false' title='' type='HTML'/>
<b:widget id='HTML7' locked='false' title='Yang mampir' type='HTML'/>
<b:widget id='HTML8' locked='false' title='Site feed' type='HTML'/>
<b:widget id='HTML9' locked='false' title='' type='HTML'/>
<b:widget id='HTML10' locked='false' title='' type='HTML'/>
</b:section> 


If you had changing your widget ID, click Save Template button. And you will see the error message again.

Add Yahoo! Messenger Emoticons To Blog


Add Yahoo! Messenger Emoticons To Blog

If you often chatting with yahoo! messenger, possibly you will familiar with emoticons such as :                      
How to adding Yahoo Emoticons to your post? there is very easy. You just add the codes to your post, what you want to put. However when you post an article, you must choose edit html tab tab, don't at compose tab tab.
This is the codes :

happy:)happy 
<img src="http://us.i1.yimg.com/us.yimg.com/i/mesg/emoticons7/1.gif" width="18" height="18" border="0"> 

sad:(sad
<img src="http://us.i1.yimg.com/us.yimg.com/i/mesg/emoticons7/2.gif" width="18" height="18" border="0"> 

winking;)winking
<img src="http://us.i1.yimg.com/us.yimg.com/i/mesg/emoticons7/3.gif" width="18" height="18" border="0"> 

big grin:Dbig grin
<img src="http://us.i1.yimg.com/us.yimg.com/i/mesg/emoticons7/4.gif" width="18" height="18" border="0"> 

batting eyelashes;;)batting eyelashes
<img src="http://us.i1.yimg.com/us.yimg.com/i/mesg/emoticons7/5.gif" width="18" height="18" border="0"> 

big hug>:D<big hug
<img src="http://us.i1.yimg.com/us.yimg.com/i/mesg/emoticons7/6.gif" width="18" height="18" border="0"> 

confused:-/confused
<img src="http://us.i1.yimg.com/us.yimg.com/i/mesg/emoticons7/7.gif" width="18" height="18" border="0"> 

love struck:xlove struck
<img src="http://us.i1.yimg.com/us.yimg.com/i/mesg/emoticons7/8.gif" width="18" height="18" border="0"> 

blushing:">blushing
<img src="http://us.i1.yimg.com/us.yimg.com/i/mesg/emoticons7/9.gif" width="18" height="18" border="0"> 

tongue:Ptongue
<img src="http://us.i1.yimg.com/us.yimg.com/i/mesg/emoticons7/10.gif" width="18" height="18" border="0"> 

kiss:-*kiss
<img src="http://us.i1.yimg.com/us.yimg.com/i/mesg/emoticons7/11.gif" width="18" height="18" border="0"> 

broken heart=((broken heart
<img src="http://us.i1.yimg.com/us.yimg.com/i/mesg/emoticons7/12.gif" width="18" height="18" border="0"> 

surprise:-Osurprise
<img src="http://us.i1.yimg.com/us.yimg.com/i/mesg/emoticons7/13.gif" width="18" height="18" border="0"> 

angryX(angry
<img src="http://us.i1.yimg.com/us.yimg.com/i/mesg/emoticons7/14.gif" width="18" height="18" border="0"> 

smug:>smug
<img src="http://us.i1.yimg.com/us.yimg.com/i/mesg/emoticons7/15.gif" width="18" height="18" border="0"> 

coolB-)cool
<img src="http://us.i1.yimg.com/us.yimg.com/i/mesg/emoticons7/16.gif" width="18" height="18" border="0"> 

worried:-Sworried
<img src="http://us.i1.yimg.com/us.yimg.com/i/mesg/emoticons7/17.gif" width="18" height="18" border="0"> 

whew!#:-Swhew!
<img src="http://us.i1.yimg.com/us.yimg.com/i/mesg/emoticons7/18.gif" width="34" height="18" border="0"> 

devil>:)devil
<img src="http://us.i1.yimg.com/us.yimg.com/i/mesg/emoticons7/19.gif" width="18" height="18" border="0"> 

crying:((crying
<img src="http://us.i1.yimg.com/us.yimg.com/i/mesg/emoticons7/20.gif" width="22" height="18" border="0"> 

laughing:))laughing
<img src="http://us.i1.yimg.com/us.yimg.com/i/mesg/emoticons7/21.gif" width="18" height="18" border="0"> 

straight face:straight face
<img src="http://us.i1.yimg.com/us.yimg.com/i/mesg/emoticons7/22.gif" width="18" height="18" border="0"> 

raised eyebrow/:)raised eyebrow
<img src="http://us.i1.yimg.com/us.yimg.com/i/mesg/emoticons7/23.gif" width="18" height="18" border="0"> 

rolling on the floor=))rolling on the floor
<img src="http://us.i1.yimg.com/us.yimg.com/i/mesg/emoticons7/24.gif" width="30" height="18" border="0"> 

angelO:-)angel
<img src="http://us.i1.yimg.com/us.yimg.com/i/mesg/emoticons7/25.gif" width="30" height="18" border="0"> 

nerd:-Bnerd
<img src="http://us.i1.yimg.com/us.yimg.com/i/mesg/emoticons7/26.gif" width="24" height="18" border="0"> 

talk to the hand=;talk to the hand
<img src="http://us.i1.yimg.com/us.yimg.com/i/mesg/emoticons7/27.gif" width="18" height="18" border="0">

Yahoo Hidden Emoticons


puppy dog eyes - New!:o3puppy dog eyes - New!

<img src="http://us.i1.yimg.com/us.yimg.com/i/mesg/emoticons7/108.gif" width="31" height="18" border="0"> 

I don't know:-??I don't know
<img src="http://us.i1.yimg.com/us.yimg.com/i/mesg/emoticons7/106.gif" width="40" height="18" border="0"> 

not listening%-(not listening
<img src="http://us.i1.yimg.com/us.yimg.com/i/mesg/emoticons7/107.gif" width="52" height="18" border="0"> 

pig:@)pig
<img src="http://us.i1.yimg.com/us.yimg.com/i/mesg/emoticons7/49.gif" width="18" height="18" border="0"> 

cow3:-Ocow
<img src="http://us.i1.yimg.com/us.yimg.com/i/mesg/emoticons7/50.gif" width="18" height="18" border="0"> 

monkey:()monkey
<img src="http://us.i1.yimg.com/us.yimg.com/i/mesg/emoticons7/51.gif" width="21" height="18" border="0"> 

chicken~:>chicken
<img src="http://us.i1.yimg.com/us.yimg.com/i/mesg/emoticons7/52.gif" width="18" height="18" border="0"> 

rose@};-rose
<img src="http://us.i1.yimg.com/us.yimg.com/i/mesg/emoticons7/53.gif" width="18" height="18" border="0"> 

good luck%%-good luck
<img src="http://us.i1.yimg.com/us.yimg.com/i/mesg/emoticons7/54.gif" width="18" height="18" border="0"> 

flag**==flag
<img src="http://us.i1.yimg.com/us.yimg.com/i/mesg/emoticons7/55.gif" width="25" height="18" border="0"> 

pumpkin(~~)pumpkin
<img src="http://us.i1.yimg.com/us.yimg.com/i/mesg/emoticons7/56.gif" width="17" height="18" border="0"> 

coffee~O)coffee
<img src="http://us.i1.yimg.com/us.yimg.com/i/mesg/emoticons7/57.gif" width="18" height="18" border="0"> 

idea*-:)idea
<img src="http://us.i1.yimg.com/us.yimg.com/i/mesg/emoticons7/58.gif" width="30" height="18" border="0"> 

skull8-Xskull
<img src="http://us.i1.yimg.com/us.yimg.com/i/mesg/emoticons7/59.gif" width="18" height="18" border="0"> 

bug=:)bug
<img src="http://us.i1.yimg.com/us.yimg.com/i/mesg/emoticons7/60.gif" width="20" height="18" border="0"> 

alien>-)alien
<img src="http://us.i1.yimg.com/us.yimg.com/i/mesg/emoticons7/61.gif" width="18" height="18" border="0"> 

frustrated:-Lfrustrated
<img src="http://us.i1.yimg.com/us.yimg.com/i/mesg/emoticons7/62.gif" width="18" height="18" border="0"> 

praying[-O<praying
<img src="http://us.i1.yimg.com/us.yimg.com/i/mesg/emoticons7/63.gif" width="18" height="18" border="0"> 

money eyes$-)money eyes
<img src="http://us.i1.yimg.com/us.yimg.com/i/mesg/emoticons7/64.gif" width="18" height="18" border="0"> 

whistling:-"whistling
<img src="http://us.i1.yimg.com/us.yimg.com/i/mesg/emoticons7/65.gif" width="22" height="18" border="0"> 

feeling beat upb-(feeling beat up
<img src="http://us.i1.yimg.com/us.yimg.com/i/mesg/emoticons7/66.gif" width="18" height="18" border="0"> 

peace sign:)>-peace sign
<img src="http://us.i1.yimg.com/us.yimg.com/i/mesg/emoticons7/67.gif" width="22" height="18" border="0"> 

shame on you[-Xshame on you
<img src="http://us.i1.yimg.com/us.yimg.com/i/mesg/emoticons7/68.gif" width="22" height="18" border="0"> 

dancing\:D/dancing
<img src="http://us.i1.yimg.com/us.yimg.com/i/mesg/emoticons7/69.gif" width="26" height="18" border="0"> 

bring it on>:/bring it on
<img src="http://us.i1.yimg.com/us.yimg.com/i/mesg/emoticons7/70.gif" width="23" height="18" border="0"> 

hee hee;))hee hee
<img src="http://us.i1.yimg.com/us.yimg.com/i/mesg/emoticons7/71.gif" width="18" height="18" border="0"> 

chatterbox:-@chatterbox
<img src="http://us.i1.yimg.com/us.yimg.com/i/mesg/emoticons7/76.gif" width="36" height="18" border="0"> 

not worthy^:)^not worthy
<img src="http://us.i1.yimg.com/us.yimg.com/i/mesg/emoticons7/77.gif" width="32" height="18" border="0"> 

oh go on:-joh go on
<img src="http://us.i1.yimg.com/us.yimg.com/i/mesg/emoticons7/78.gif" width="26" height="18" border="0"> 

star(*)star
<img src="http://us.i1.yimg.com/us.yimg.com/i/mesg/emoticons7/79.gif" width="18" height="18" border="0"> 

hiroo->hiro
<img src="http://us.i1.yimg.com/us.yimg.com/i/mesg/emoticons7/72.gif" width="18" height="18" border="0"> 

billyo=>billy
<img src="http://us.i1.yimg.com/us.yimg.com/i/mesg/emoticons7/73.gif" width="18" height="18" border="0"> 

aprilo-+april
<img src="http://us.i1.yimg.com/us.yimg.com/i/mesg/emoticons7/74.gif" width="18" height="18" border="0"> 

yin yang(%)yin yang
<img src="http://us.i1.yimg.com/us.yimg.com/i/mesg/emoticons7/75.gif" width="18" height="18" border="0"> 


This is the steps to add YM emoticons 

When you post your article, choose  tab. Write your article, and add some emoticons where you want at your post. For example :
Hi everybody, today i feel <img src="http://us.i1.yimg.com/us.yimg.com/i/mesg/emoticons7/1.gif" width="18" height="18" border="0"> because i'm <img src="http://us.i1.yimg.com/us.yimg.com/i/mesg/emoticons7/8.gif" width="18" height="18" border="0"> to someone <img src="http://us.i1.yimg.com/us.yimg.com/i/mesg/emoticons7/9.gif" width="18" height="18" border="0">
Publish your post, and the result will be like this :
Hi everybody, today i feel  because i'm  to someone 

Besides above steps, there is other way which more simple that is as follows :

  1. You must used Firefox browser when you following this tutorial.
  2. Open your Firefox browser
  3. Install greas monkey, please click here!
  4. Click this script, and then click install.
  5. Go to yout template editor, and find this code ]]></b:skin>
  6. Copy and paste following codes above of ]]></b:skin>
  7. img.emoticon {
    padding: 0;
    margin: 0;
    border: 0;
    }
  8. Click Save Template button.
  9. Done.

After this, you will see the emoticons at your post Editor. However it only at compose tab tab editor. Screenshot :

post editor with yahoo emoticons

Remember, this is work at Firefox, not for internet explorer.

Followers

Featured Video

About Me : Herdiansyah Hamzah